Beginner’s Guide on How to Add Avalanche to MetaMask

crypto news
Blockchain as a technology stack is still relatively new, but it is developing at a lightning pace. First-generation cryptocurrencies like Bitcoin are considered battle tested and well-established and even the second generation ones are mature. But what about third generation-chains like Avalanche?
Given the sheer number of great projects out there, Avalanche’s focus on interoperability is extremely notable. Its smart contracts are written in the same Solidity programming language as Ethereum, so overlaps between the two chains are common.
One of these is MetaMask. Considered by some distance to be the best hot wallet in crypto, the ConsenSys-designed MetaMask is versatile and easy to use and can be configured to work with plenty of blockchains.
So, how exactly do you add Avalanche to Metamask, and why should you consider it? Read on for that and much more.
What is Avalanche?
As mentioned, Avalanche is a third-generation blockchain and uses Solidity for smart contracts. It was conceived by a pseudonymous group of developers called Team Rocket in 2018 and launched by Ava Labs in 2020 with an initial coin offering that raised $42 million.
A year later, the AVAX token was subject to another sale that raised $230 million from various participants, including venture capitalists. This followed the launch of the first Avalanche testnet in April 2020.
Avalanche uses a unique form of proof of stake consensus to take on the blockchain trilemma of scalability, security, and decentralization. When a user initiates a transaction on the network, a validator node samples a small set of other validators to check for agreement.
The process is repeated, and the validator’s message is sent out to others again and again until the system reaches a consensus. This mechanism is often alluded to as the “avalanche” that gives the project its name.
Avalanche also involves two other proofs in its consensus mechanism. A proof of uptime scales validator rewards based on how long they’ve been bonded, and a proof of correctness ensures that validators have a good track record of behaving according to the protocol.
How to Set up MetaMask
As mentioned, MetaMask was developed by Consensys and supported by Ethereum developers. It’s one of, if not the most, well-known non-custodial wallets available. It’s also compatible with browsers on multiple platforms, and it can be configured to use many more blockchains than just Ethereum.
So, first things first, we need to get MetaMask up and running. Here’s how!
#1. Download and Install Metamask
First off, you need to download the MetaMask wallet from its official website. Remember not to just Google it—one of the most famous scams in the industry is to set up a fake site via Google Ads.
Instead, visit the MetaMask website directly and download the wallet from there. Make sure the address is correct and the site is secure via the HTTPS protocol. You can select from Chrome, iOS, and Android versions, and the wallet even supports other browsers such as Firefox, Brave, Edge, and Opera.
#2. Set up Your MetaMask Wallet
Once you’ve installed MetaMask, you can choose between creating a new wallet or importing an existing one. The latter option is useful if you’ve changed computers or want to switch to Metamask from another wallet.
To import an existing wallet, you’ll need to enter your 12 to 24-word recovery seed phrase. That’ll restore whatever crypto assets were in it previously, but using the MetaMask interface instead.
If this is your first time creating a wallet, or if you want to create a new wallet for Avalanche, you can click “Create a wallet.” After entering a password, you’ll be prompted to set up your secret recovery phrase. This is a very important step, so ensure you write your recovery seed phrase down and keep it safe.
How to Add Avalanche to MetaMask
So, you’re set up with a MetaMask wallet. Now for the meat and potatoes—how to add Avalanche to MetaMask. Luckily, MetaMask is a simple, easy-to-use wallet that allows adding other networks with just a couple of clicks.
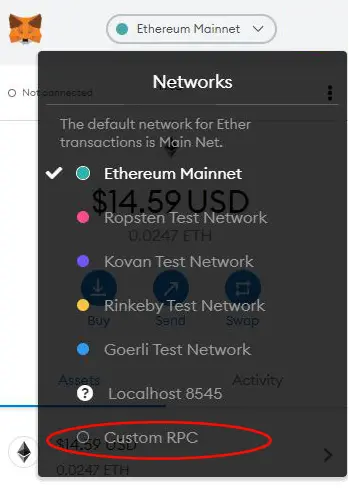
Log into MetaMask, then click on the circle in the top right corner of the interface and open “Settings.” That’ll give you a list of options, from which you can click on “Network.”
Now, you should see a dropdown list of networks available on the wallet. If it’s a newly installed wallet, Ethereum Mainnet may be the only one currently listed. Hit the “Custom RPC” button at the bottom to bring up the form that you see in this picture:
Now, all you have to do is fill out the form using the following information:
- Network name. Avalanche Mainnet C-Chain
- New RPC URL. https://api.avax.network/ext/bc/C/rpc
- Chain ID. 43114
- Symbol. AVAX
- Explorer. https://snowtrace.io/
Once you fill out the form, click “Save,” and you’re finished! Whenever you want to use the Avalanche network, just click the dropdown menu of networks as you did before. You should now see Avalanche Mainnet as one of your options.
Once you switch to the Avalanche network, you’ll see your wallet details and any tokens you own, including your AVAX token balance.
If you want to give the Avalanche FUJI Testnet a try, here are the details you’ll need to enter:
- Network name. Avalanche FUJI C-Chain
- New RPC URL. https://api.avax-test.network/ext/bc/C/rpc
- Chain ID. 43113
- Symbol. AVAX
- Explorer.https://testnet.snowtrace.io/
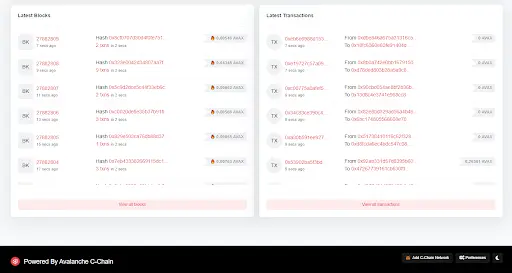
It’s also possible to add Avalanche to MetaMask directly via SnowTrace, the Avalanche network explorer. If you visit the site, a button at the bottom-right of the interface will prompt you to log in to your MetaMask wallet before syncing things up automatically.
How to Send AVAX to Your MetaMask Wallet
You’ll need to fund your new AVAX wallet to start transacting on the Avalanche blockchain with it, so this is a good step to add to your list.
Simply log in to your MetaMask wallet and ensure you have the Avalanche Mainnet C-Chain selected. At the top of the wallet UI is an account name with a truncated string of alphanumerics below it. This is your wallet’s public key.
Now, you can visit an exchange or navigate to a different wallet that holds your AVAX funds. Initiate a transaction, and paste your MetaMask wallet’s address in the recipient field. It’s a good idea to double or triple-check that the wallet address you pasted in is correct—clipboard malware was invented just for this scenario.
The Future of Avalanche
Avalanche is a next-generation blockchain and has a great reputation in the community for its usability and speed. It’s not very expensive to use, and its interoperability with Ethereum makes it a fantastic choice for users and dApp developers.
The blockchain has a unique approach to consensus, and its triple-chain architecture makes it a serious contender for the long haul. It’s being adopted by businesses and developers every day and has a very strong basis, including a powerful treasury from which to build.
Key Takeaways
MetaMask was originally built for Ethereum but can be used across various blockchains, including many or most new projects. It’s considered one of the best in the business and is extremely easy to configure and use if you know how.
By following the steps listed in this article, you can use MetaMask on the Avalanche blockchain as well. Simply install MetaMask, then add the Avalanche Mainnet C-Chain using the relevant details (or directly from SnowTrace), and you’re good to go!